Thank you for downloading .netCHARTING. This document will help you work with the product and will serve as a programmers reference.
Here are some helpful tips to get started.
| Quick Start | (Recommended Reading)
As you explore the features and functionality of this component you will find it is extremely powerful and capable of creating virtually any charts you may need. This software has also been developed to be much more flexible than the status quo, which, will enable you to push the charting envelope beyond the standards you may be used to. This section will give a general overview of how everything works and get you started quickly. So without further ado, let's get to it. Step 1. Installation Please see the Illustrated QuickStart or the instructions in the installation help topic to get the component installed and able to view the accompanying samples. If you're an advanced user, simply unzip the download into a folder, make it a virtual directory and an asp.net application. Then make sure the temp folders under the directories with all the samples have full permissions for user 'aspnet'.
Step 2. Explore the samples After the component is installed, take a look at the samples to get a grasp of the available features. You may see some interesting functionality that will give you ideas for charts you will be creating.
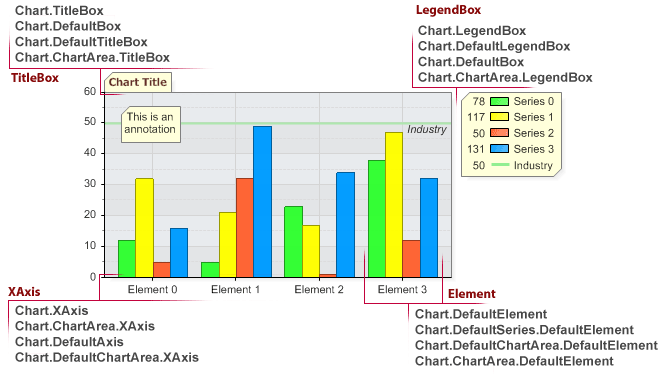
Step 3. Your First Chart The best way way to get started is to take a sample that is similar to the type of chart you want and modify the property settings. Because many different charting applications use different terminology, it is also important to know the terminology used in .netCHARTING. Below is a chart image with a few basic terms. Basic Terminology
More image references: Labels | Lines.
Step 3.1. Getting/Using Data .netCHARTING has a simple yet powerful interface for data acquisition and manipulation. Chart data is represented by SeriesCollection, Series, and Element classes. For more information on this model see this topic. When you are familiar with the general data model, you can explore the connecting to data sources and using query strings sections to learn how to populate these classes automatically.
Step 3.2. Chart Type An important point to remember is that the data model is independent from the chart engine itself. This means that whatever data you get, you will be able to create any chart with it. The mechanism behind chart types is also quite flexible.
Step 4. Exploring other features You will now be able to generate basic charts and have a general idea of how to change the chart type. Most of the time, this is not enough to create the exact chart you need. Fortunately, we have covered only about 5% of the functionality available. Moving forward, there are many tutorials at your disposal. You may also visit the support section of our website to download printable PDF versions of some tutorials so that you can review them at your leisure. |
| Tutorials |
|
If you have any questions please visit the .netCHARTING support website or contact support.


