Installation is fully automated with the MSI however if you wish to manually install or xcopy deploy to a remote server you don’t have permissions to run the MSI on you can follow the manual installation steps:
|
Procedure |
|---|
| 1. Run the MSI installer |
| 2. Specify manual installation. |
| 3. Ensure that dotnetCHARTING.dll and your purchase key are located in the /bin directory and that the /bin directory is in the root (top level) of your web site or, if not, that you have created an application for the subdirectory which contains your /bin directory. Note: a key is not required for the trial. |
|
Ensure the temp directories have appropriate permissions set. See below.
4. You may now use the .netCHARTING samples |
|
Using a Virtual Directory |
|---|
| 1. Run the MSI installer with manual installation option |
| 2. Place files in any directory you wish. |
| 3. Using the IIS administration (MMC), create a virtual directory under your web site pointing to the /web directory that contains the .netCHARTING samples. Click here for more information on virtual directory creation. |
| 4. Ensure that your purchase key is located in the /bin directory along with dotnetCHARTING.dll. Note: a key is not required for the trial. |
| 5. You may now use .netCHARTING samples |
|
Setting Directory Permissions: |
|---|
|
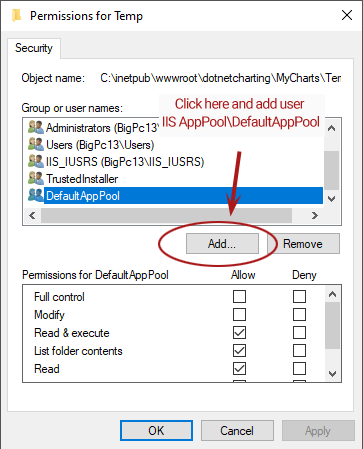
.netCHARTING creates image files dynamically to display charting data. By default, these temporary images are written to the same directory of the calling script, alternatively, the TempDirectory property can be set to a path of your choice. Either way, the ASP.NET worker process must have permissions to write to this directory. If your permissions are not already configured to allow write access, right click on the directory in question and select properties, select security, permissions and add the "IIS AppPool\DefaultAppPool" user with write permissions. See Image 
Troubleshooting
If you are remotely hosting contact your web host and ask for write permissions on the directory of your choice. These are the same permissions required to add any data to a database or modify a text or XML file. Your host may also have created a special directory for this case such as /data. In this case you can set the TempDirectory to this directory and make no permissions changes. |
|
Working with Visual Studio: |
|---|
| A step by step guide is provided for working with .netCHARTING in visual studio along with common errors and resolutions you may encounter in this environment. View Guide |